Crochet Star - Free Pattern
So I was just fiddling around with something while I was waiting at school pick-up the other day, and this is what I came up with!
This would look cute on the cloud or round ring teethers too! (I just happened to have a few star ones laying around to use)
------------------------------------------------------------------------------------------------------------------------------------------------

CROCHET STAR TEETHING RING
MATERIALS:
- Cotton Yarn (I used Scheepjes Catona Denim 102)
- Hook to accommodate yarn choice
- Yarn sewing needle
- Scissors
- Wooden Teething Ring
ABBRIEVIATIONS: US terms
| MR - Magic Ring | sc - single crochet | dc - double crochet |
| tr - treble | sl st - slip stitch | ch - chain |
| picot - ch2, sc into tr st | sp - space | st - stitch |
| (....) - repeat between the brackets | [4] - stitch count | sk - skip |
PATTERN:
STAR: x2 Panels
R1/ MR, sc1, ch 1 into ring (makes 1st dc), dc9 into ring, close ring tightly, sl st into ch1 [10]


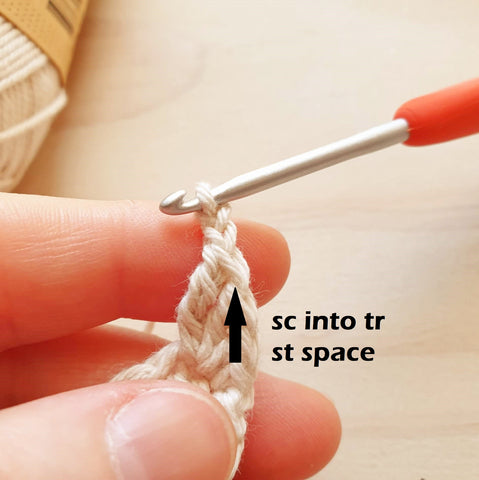
R2/ ch1, sc in same st as join, (dc2, tr, picot, dc2) into next st, sc1) x5 [5 points]


Panel 1: Tie off and make another panel
Panel 2: DO NOT tie off, ch1 then place both panels with the wrong sides touching together, sc through BOTH panels up the sides and 3 sc in the picot ch2 sp (tips of the star), tuck in your ends before closing the last star point, once you reach the beginning, tie off with and invisible stitch finish or tie off and weave in the end


![]()


ROPE:
R1/ (LEAVE AT LEAST 20cm BEGINNING TAIL) ch4, in 2nd ch from hook, sc3 back, ch1 TURN

R2/ sc3 across, ch1 TURN
R3-22/ sk1, sc3 (last sc goes into previous turning ch helps keep a straight edge)


- Tie off leaving a long tail to sew to the star
FINISHING:
- Sew one end of the rope to the star, lining up the middle of the 3 sc on the rope with the sc in between the 2 dc of the points (dc, sc, dc is where you should sew the rope on)

- Place the other end though the ring, and sew close to the ring to form a loop and make sure you have the joins at the back before final sewing
- Weave in the ends


Voilà... you are finished!

Please feel free to share your project on our Yarn Magic Facebook page or Yarn Magic Circle Community Facebook Group or use #magicmakes on Instagram to have your project featured on our Instagram page @yarn.magic.yarns