Hop into Easter with Eggwardo the Eggcellent!
An alternative to Easter chocolate??? Perish the thought!
However, as an alternative to chocolates; Eggwardo the Eggcellent may just take your mind off not having that velvety, gooey, chocolatey goodness.... erm... moving on!
This flatigurumi is quick and easy to make.
You can even add a rattle inside for little Easter enthusiasts to entertain and delight the senses.
------------------------------------------------------------------------------------------------------------------------------------------------

EGGWARDO THE EGGCELLENT!
MATERIALS:
- 1x Ball Panda Acrocraft Stripe 8ply yarn (Eggwardo: Cool Stripe/Eggilea: Springtime Stripe)
- 3.5mm Hook
- 32mm Cartoon Safety Eyes (If not embroidering them)
- Coloured Embroidery Cotton for Eyes/Nose/Mouth
- Yarn Sewing Needle
- Pompom Maker
- 8x Stitch Markers
- Fibre Fill
ABBRIEVIATIONS: US terms
| sc - single crochet | FLO - Front Loop Only | ch - chain |
| inc - increase (2sc in same st) | sl st - slip stitch | st - stitch |
| dec - decrease (sc2tog) | sp - space | sk - skip |
| (....) - repeat between the brackets | [4] - stitch count | WS - Wrong Side |
PATTERN:
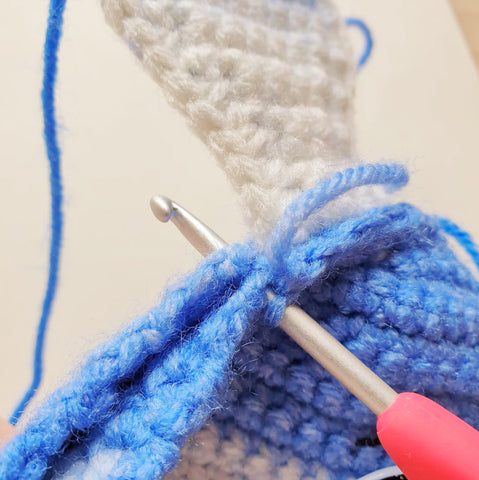
EARS: x2 (Photos Below) ** ch1 and turn at end of each row **
| R1/ ch4, starting in 2nd ch from hook, sc3 [3] | R20/ FLO - sc all across [2] (see photo below) |
| R2-3/ (2 rows) sc all across [3] | R21/ sc1, inc [3] |
| R4/ inc, sc1, inc [5] | R22/ inc, sc1, inc [5] |
| R5/ sc all across [5] | R23/ inc, sc3, inc [7] |
| R6/ inc, sc3, inc [7] | R24/ sc all across [7] |
| R7/ sc all across [7] | R25/ inc, sc5, inc [9] |
| R8/ inc, sc5, inc [9] |
R26-31/ (6 rows) sc all across [9] |
| R9-14/ (6 rows) sc all across [9] | R32/ dec, sc5, dec [7] |
| R15/ dec, sc5, dec [7] | R33/ sc all across [7] |
| R16/ sc all across [7] | R34/ dec, sc3, dec [5] |
| R17/ dec, sc3, dec [5] | R35/ sc all across [5] |
| R18/ dec, sc1, dec [3] | R36/ dec, sc1, dec [3] |
| R19/ sc1, dec [2] | R37-39/ (3 rows) sc all across [3] |
- DO NOT TIE OFF
- Fold the bottom up and line up edges
- ch1, sc through both sides of the ear, in each st around the outside, all the way around until you get back to the beginning
- Tie off
- Make another the same


BODY: x2 Panels (Photos Below) ** ch1 and turn at end of each row **
| R1/ ch18, starting in 2nd ch from hook, inc, sc15, inc [19] | R33/ dec, sc25, dec [27] |
| R2/ (WS) inc, sc17, inc [21] | R34/ sc all across [27] |
| R3/ inc, sc19, inc [23] | R35/ dec, sc23, dec [25] |
| R4/ inc, sc21, inc [25] | R36/ dec, sc21, dec [23] |
| R5/ inc, sc23, inc [27] | R37/ dec, sc19, dec [21] |
| R6/ sc all across [27] | R38/ dec, sc17, dec [19] |
| R7/ inc, sc25, inc [29] | R39/ dec, sc15, dec [17] |
| R8/ sc all across [29] | R40/ dec, sc13, dec [15] |
| R9/ inc, sc27, inc [31] | R41/ sk1, dec, sc9, sk1, dec [11] (see photos below) |
| R10-30/ (21 rows) sc all across [31] | R42/ sk1, dec, sc5, sk1, dec [7] |
| R31/ dec, sc27, dec [29] | R43/ dec, sc3, dec [5] |
| R32/ sc all across [29] |


Panel 1: Tie off and make another panel
Panel 2: DO NOT TIE OFF!
- Place a stitch marker to stop from unravelling
- Insert the cartoon eyes in the middle in between R31 & R32 and embroider eyebrows and whiskers (you can also embroider eyes)
- Place both panels with the wrong sides touching together (EVEN rows are the wrong side), and use the other stitch markers to line up the rows and keep them together
- Sew the ears on to the sides of the head making sure you secure them through BOTH panels close to the edge but not over it
- Starting where you left off, remove the stitch marker; ch1, sc through BOTH panels (when working the ear section, sc through the edge in front of the ear, then work through both panels again once you are past the ear), tuck your ends in and stuff as you get closer to the beginning (i.e. halfway up the other side), making sure that all ends are in and you stuffed the top before finishing the last stitch
- Tie off with and invisible stitch finish or tie off and weave in the end


FINISHING:
- Make a 5-6cm Pompom and sew it to the back, in the middle, between R11 & R12


Voilà... you are finished!

 is here! Shop now, pay later in 4 easy installments
